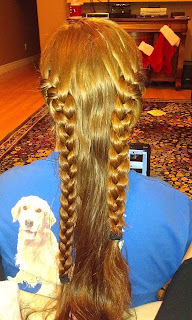
I don't really remember how the Rapunzel braid got started. I think I was just messing around. It was definitely after we did the Warrior braid, but after a while I got sick of calling it the 'tri-braid'. It didn't seem like a cool name. Then it occurred to me that it kind of looked like Rapunzel's braid in Tangled! So here it is!
This is the finished product :)
What you'll need:
3 Hair ties
That's pretty much it!
Step one: Start french braid, just like you would would be french braiding your bangs
We like to use a side part, but you don't necessarily have to.
Step 2: Start adding in other hair once you get across your forehead.
Step 3: Stop taking more hair once you reach your neck taking hair from your top layers until you're about to the center of the back of your head then braid it all the way down.. Then tie it off.
Step 4: Start a french braid on the other side of your head, once again taking hair until you reach your neck, then braid it the rest of the way down.
Then you should have two braids just like this.
Step 5: Braid the remaining hair normally. I've tried this a bunch of different ways. I've tried french braiding it a little, but for me, just the regular braid works best.
Step 6: This may seem weird, but I've tried the order of the braids a bunch of different ways too, seeing which one is best on top, left over right and then the last braid you did coming up from the middle works the best so that the braids aren't sticking off each other.
Step 7: Braid it down like a normal braid.
Step 8: I take out the hair ties as I come to them when I'm braiding down. Usually one strand is done long before the other two and you can just braid it down as far as the layers allow.
You're all finished! :)
Also, if it's wet (which is easier) then when you take it out you get these beautiful waves :)
The longer you leave the braid, the tighter the waves. It even works on my little sister's super thick, refuse to scrunch hair.


No comments:
Post a Comment